 This week: The Pointed Drafting Divider.
I only bought this thing a year ago, and in that time it's become my third most-used tool. #1 is my pencil and #2 is my eraser. That's right- this thing gets more drafting table and sketchbook time than any or my markers, sticks, brushes or nibs. Why? because it's the most brilliant, multi-tasking, time-saving thing I've ever owned. I find new things to do with it all the time. This thing has made my life better like a good friend makes your life better- the longer you know it, the more incredible and helpful it seems. I'd lean out of an airplane and toss them to people from a huge sack for everyone to have, except that the points are needle-sharp and I'd end up killing and maiming thousands if I did.
This is what my baby looks like:
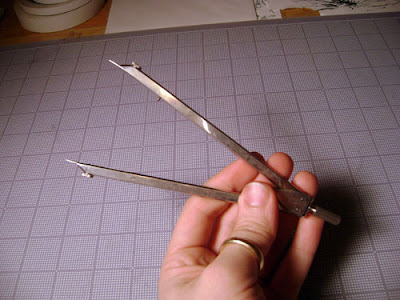
Let me show you how to use it. (as always, click on small images to make them larger.)
The most basic, most helpful thing it does is allow you to make evenly spaced marks super-dooper fast without having to use a ruler. Rulers work great, but using a ruler to rule 50 tiny marks is a HUGE pain in the ass, for the following reasons:
A: your head needs to be right above the marks you make, or else perspective distortion will cause your lines to be ever-so-slightly off from the actual ruled line. This is not fun to find out when you're inking and you find out a line doesn't really look right.
B and C: If you have an inclined drafting table, you have to press hard against the ruler and tape the paper down securely to make sure both don't start sliding down while you work.
D: My clumsy hands always seem to jostle the ruler and I constantly have to reposition it. The longer the ruler has to be down, the more I jostle and have to re-set.
E: You can try to save time by marking off the space on the ruler and moving that along the line, but it's awkward to slide the whole ruler and you have to mark up the ruler, which then needs cleaning! This is the part of the infomercial where the person tears their hair out and declaims "There must be a better way!"

There is. Instead of marking off your spaces with a ruler like a chump (1.), measure the increment you want with your handy-dandy pointed drafting divider (2.), and then go right down the line making perfect, even spaces! (3.) As you can see, they come out more even than my ruled marks! (4.)

But that's just the beginning. Having a tool that can adjust to any width and hold that width means no more measuring, ever again! Which is great, because what would often happen to me when I'd go to evenly divide a line that I'd drawn freehand, I'd get some number like 5 and 13/32", which if you try to divide my half or thirds is fucking unmeasurable. Now when I want to divide a line I don't even look at my ruler.
I put the divider on one side of the line, and guess where the exact middle is. (1.) Then I swing it over to check, and usually I'm a little under, as I am here. (2.) So I expand my divider to fill about half the extra distance, put it back on one end and try again. That's closer, but still not quite there, (3.), so I refine a little more, and voila, in about five seconds I have the exact half-length of the line, (4.), and it's midpoint (5.) Once you have that, you can add your gutter spacing, if you were dividing it to make two tiers or two panels. (6.) Just use the divider to measure one of your other gutters and poke it right where it's needed. The prongs are specially made to be so thin that with careful use they won't harm your paper in any noticeable way. I can ink right over the teensie holes it leaves.

Now let me show you some more advanced tricks:
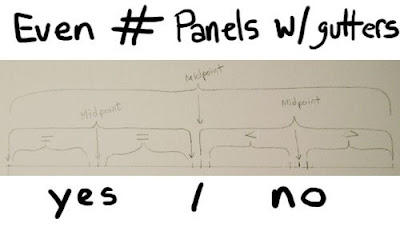
A common problem I see that even some professionals never figure out how to solve is how to divide a page into tiers that are of even height. It's easy to divide a page into equal parts by dividing the length by 3 or 4, but people run into a wall when they add gutters. The most common mistake is to draw the gutters around the lines, which leaves the middle tiers scrunched up and the outer panels larger, with an uneven and amateurish result. (right below)
The solution is easy, but different for even and odd numbered tiers. For even # tiers, find the middle of the page, and DO draw your gutter around that. But then when you divide those two halves in half, don't use the midpoint, use the edges of the gutter around the midpoint, like on the left below. Repeat as necessary, and all your tiers will be totally even between their gutters. This also works with a ruler, by the way.
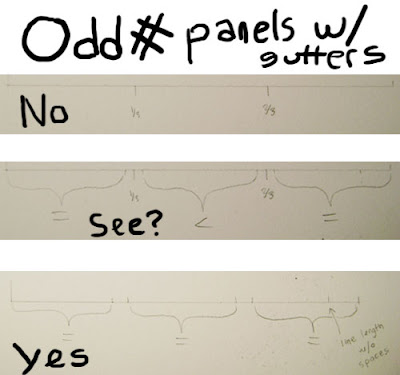
For odd # tiers, you need a different approach. As you can see below, you start with the same basic problem: tiers in the middle get scrunched up short and the outer ones are too long.
Instead of dividing the whole line into 3 or 5 or whatever and then drawing in gutters, like in the top two examples below, figure out how many gutters you'll have, and then subtract their distance from the line, and now divide that up. Then use that distance and alternate plugging that and the gutter distance in along the line, as in the bottom example below:
Now let's say you have some crazy amount of tiers that would take forever to split up with the divider. That's when you pull out a metric ruler with really small spaces and a calculator, or if you have the equipment, do the division in Photoshop and measure it off the screen with the image set so inches on the screen are actual size. Once you have the measurement you can use the divider to make the spaces.
But the thing I use my divider for most is keeping my proportions consistent, and for taking measurements off of photographs and drawings. It's great because I don't have to actually know how long something is, just how it relates proportionally to something else. It's like how some artists use their pencil shaft to take measurements when they draw.
Here's a great example of how the divider helped me out: Awhile back I did a poster for Patton Oswalt, and I needed to learn how to draw his face quickly. I'm not naturally very good at faces, so to give myself a head start I used the divider to measure parts of his face against one another to give myself an idea of how big different parts really were compared to one another. Here's part of a sketchbook page of the measurements I made:
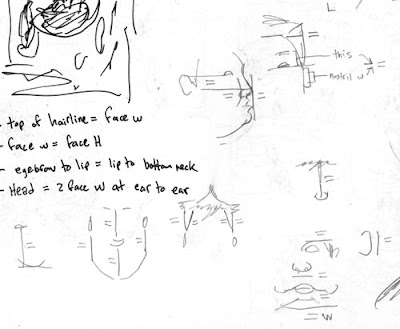
Doing this put me days ahead in being able to draw Patton recognizably. The divider also really helped recently when I was learning how to draw horses. With all the things I can do with it, you can see why the divider has become such an important tool for me.
Next week's topic: ERASE YOUR FUCKING PENCILS


 This week: The Pointed Drafting Divider.
 Let me show you how to use it. (as always, click on small images to make them larger.)
 There is. Instead of marking off your spaces with a ruler like a chump (1.), measure the increment you want with your handy-dandy pointed drafting divider (2.), and then go right down the line making perfect, even spaces! (3.) As you can see, they come out more even than my ruled marks! (4.)
 But that's just the beginning. Having a tool that can adjust to any width and hold that width means no more measuring, ever again! Which is great, because what would often happen to me when I'd go to evenly divide a line that I'd drawn freehand, I'd get some number like 5 and 13/32", which if you try to divide my half or thirds is fucking unmeasurable. Now when I want to divide a line I don't even look at my ruler.
 Now let me show you some more advanced tricks:
 For odd # tiers, you need a different approach. As you can see below, you start with the same basic problem: tiers in the middle get scrunched up short and the outer ones are too long.
 Now let's say you have some crazy amount of tiers that would take forever to split up with the divider. That's when you pull out a metric ruler with really small spaces and a calculator, or if you have the equipment, do the division in Photoshop and measure it off the screen with the image set so inches on the screen are actual size. Once you have the measurement you can use the divider to make the spaces.
 Doing this put me days ahead in being able to draw Patton recognizably. The divider also really helped recently when I was learning how to draw horses. With all the things I can do with it, you can see why the divider has become such an important tool for me.


